

Introduction
TallyPrime is one of the most powerful and widely used accounting software solutions for businesses in India and across the globe. Whether you are a small business owner, accountant, or entrepreneur, creating a company in TallyPrime is the first and most crucial step to managing your financial data efficiently.
In this comprehensive guide, we will walk you through everything you need to know about how to create a company in TallyPrime. This step-by-step tutorial is designed in a simple, professional, and human-friendly manner, making it easy for beginners to understand and implement.
By the end of this blog, you will be able to confidently create a company in TallyPrime and start managing your accounting operations smoothly.
What is TallyPrime?
TallyPrime is an advanced business management software developed by Tally Solutions. It helps businesses manage accounting, inventory, taxation (GST), payroll, and more in a seamless and efficient way. Creating a company in TallyPrime means setting up your business profile where all financial transactions, reports, and records will be stored.
Why Creating a Company in TallyPrime is Important
Before entering any transactions, you must create a company in TallyPrime. This process defines your business identity within the software.
Key Benefits:
– Organizes financial records in one place
– Enables GST compliance
– Helps generate reports like Balance Sheet, Profit & Loss
– Ensures accurate bookkeeping
– Supports multi-company management
Before creating a company, ensure your system meets the following requirements:
– Operating System: Windows 7 or above
– RAM: Minimum 2 GB (4 GB recommended)
– Disk Space: At least 1 GB free space
– TallyPrime Latest Version (e.g., Release 7.0)
Step-by-Step Guide to Create a Company in TallyPrime
Step 1: Open TallyPrime
Once you install TallyPrime, double-click the TallyPrime icon on your desktop. The software will launch and display the Gateway of Tally screen.
Step 2: Select ‘Create Company’
On the startup screen, you will see an option:
“Create Company”
Click on this option to begin the process.
Step 3: Company Creation Screen
After clicking Create Company, a detailed form will appear where you need to enter company details.
Let’s understand each field carefully.
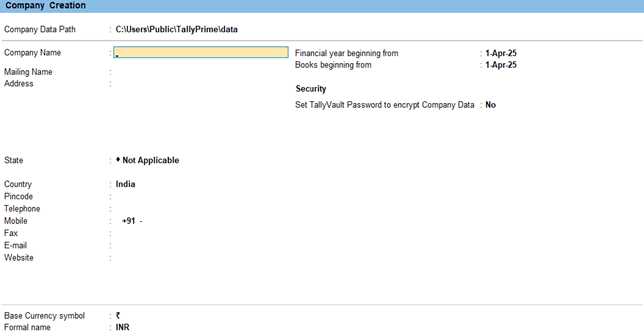
Step 4: Enter Basic Company Details
- Company Data Path
This is the location where your company data will be stored. By default, it is set automatically, but you can change it if required.
- Name
Enter your business or company name.
- Mailing Name and Address
Enter your official business address. This will appear on invoices and reports.
- Country
Select your country (India).
- State
Choose your business state. This is important for GST calculations.
- Pin Code
Enter your area pin code.
- Phone Number and Email
Provide your contact details.
Step-by-Step Guide to Create a Company in TallyPrime
Step 5: Enter Financial Details
- Financial Year Beginning From
Enter the starting date of your financial year (e.g., 01-Apr-2026).
- Books Beginning From
Enter the date from which you want to start maintaining accounts.
Step 6: Security Settings
You can enable security to protect your company data.
– Use Security Control: Yes/No
– Set Username and Password
It is recommended to enable this for data protection.
Step 7: Base Currency Information
– Currency Symbol: ₹
– Formal Name: INR
– Number of Decimal Places: 0
These settings are usually auto-filled.
Step 8: Save the Company
After entering all details, press Ctrl + A to save the company.
Congratulations! Your company has been successfully created in TallyPrime
Important Features After Company Creation
Once your company is created, you can start using TallyPrime features such as:
– Creating Ledgers
– Recording Transactions
– GST Setup
– Inventory Management
– Generating Reports
How to Alter Company Details in TallyPrime
If you need to edit company details later:
- Go to Gateway of Tally
- Press Alt + K (Company)
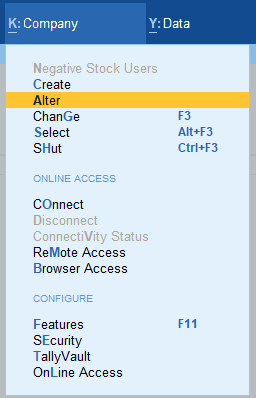
- Select Alter
- Choose your company
- Make changes and save
- Go to Gateway of Tally
- Press Alt + K
- Select Shut Company
Common Mistakes to Avoid
- Entering Incorrect Financial Year: The financial year in India typically begins on 01-Apr. Entering the wrong date can lead to mismatched reports and issues with year-end closings.
- Wrong GST State Selection: Selecting the correct state is vital because TallyPrime uses this information to calculate GST (like CGST, SGST, or IGST) correctly. An error here can lead to incorrect tax filings.
- Not Enabling Security: Failing to set a Username and Password leaves your sensitive financial data vulnerable. It is highly recommended to protect your business records from unauthorized access.
- Incorrect Address Details: Your mailing name and address appear directly on official invoices and reports. Errors here can make your business look unprofessional or cause legal compliance issues with tax authorities.
- Not Double-Checking Information: Always review your entries before saving (pressing Ctrl + A) to ensure all basic details, contact info, and currency settings are accurate from the start.
Tips for Beginners
- Always Take Backup of Your Data: Regular backups are essential to prevent data loss due to system failures or accidental deletions.
- Use Strong Passwords: When you enable security control, choose a password that is difficult to guess to ensure maximum data protection.
- Regularly Update TallyPrime: Ensure you are using the latest version (such as Release 7.0) to access new features, bug fixes, and updated statutory compliance tools.
- Learn Shortcuts for Faster Work: TallyPrime is designed for speed. Learning shortcuts (like Alt + K for company menu or Ctrl + A to save) will significantly improve your efficiency.
Conclusion
Creating a company in TallyPrime is the foundation of your accounting journey. With the right setup, you can efficiently manage your business finances, ensure compliance, and generate accurate reports. By following this detailed guide, you can easily create and manage your company in TallyPrime without any confusion.Yes, TallyPrime allows you to create and manage multiple companies.
It is not mandatory, but highly recommended for data protection.
Yes, you can alter company details anytime.
You can correct it by altering company details, but it’s better to enter it correctly initially.