
1. Introduction
TallyPrime 7.0 is the latest version of Tally’s powerful accounting software designed for businesses, accountants, and professionals. Installing TallyPrime correctly is the first step toward managing your accounting, GST, payroll, and inventory efficiently. This comprehensive guide explains how to install TallyPrime 7.0 step by step for both new and existing users. It includes downloading, installation, activation, and starting the software in a structured and easy-to-follow manner.2. What is TallyPrime 7.0?
TallyPrime 7.0 is an advanced business management software that simplifies accounting and compliance. Key features include faster performance, connected banking, improved user interface, and enhanced reporting. It is widely used by small businesses, enterprises, and accounting professionals.How to Install
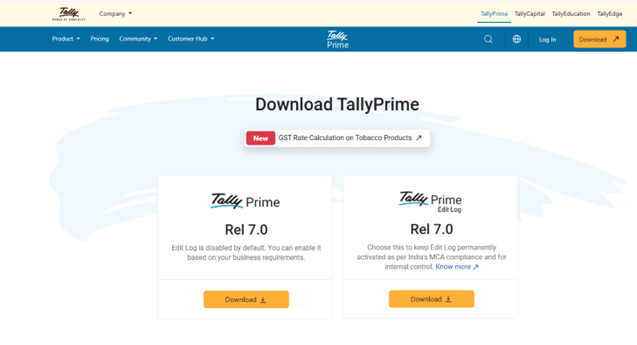
- Open your web browser (Google Chrome, Edge, etc.)
- Search for: “tallysolutions.com”
- Click on the official website of Tally Solutions Visit Tally Website
- Select the latest version
- Click on the Download button
- The setup file (usually .exe format) will start downloading
- It will be saved in your Downloads folder
Step 2: Run the TallyPrime Installer
Once the file is downloaded, the next step is to run the installer and start the setup process.
How to Run Installer:
- Go to your Downloads folder
- Locate the file (e.g., tallyprime.exe)
- Double-click on the file
If Security Prompt Appears:
- Click on “Yes” or “Run Anyway”
- This allows the installation to begin
If Installer Does Not Open:
- Right-click on the file
- Select “Run as Administrator”
Running the installer properly ensures that TallyPrime gets the required system permissions.

Step 3: Choose Installation Type
Options Available:
- Install New (For New Users)
- Select this if you are installing
TallyPrime for the first time
- It will create fresh program files
- Upgrade (For Existing Users)
- Choose this if you already have an older version
- It will upgrade without deleting your data
Best Practice:
- Always take a backup of your data before upgrading
Selecting the correct option is important to avoid data loss.
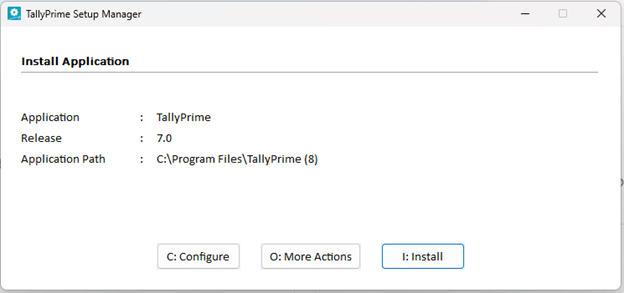
Step 4: Configure Installation Path
Before installing, you can choose where the software will be installed.
Default Path:
C:\Program Files\TallyPrime
Why This Matters:
- Default path ensures smooth functioning
- Custom path is useful for advanced users or servers
For most users, it is best to keep default settings.
Step 5: Install TallyPrime Software
Now comes the actual installation step.
Steps:
- Click on the Install button
- Wait for a few seconds
During Installation:
- Files will be copied to your system
- Required components will be installed automatically
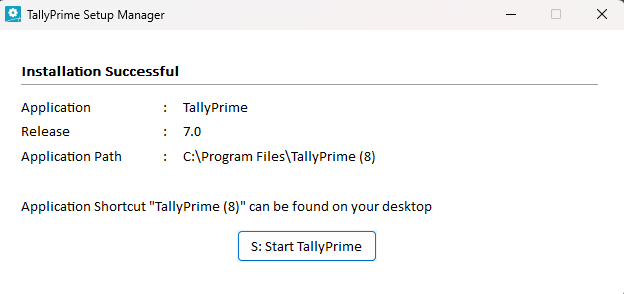
Once completed, you will see a confirmation message.
Step 6: Start TallyPrime
After installation is complete, you can launch the software.
How to Start:
- Click on “Start TallyPrime”
- Or open from desktop shortcut
What You Will See:
- Welcome screen of TallyPrime
- Gateway of Tally interface
This confirms that installation is successful.
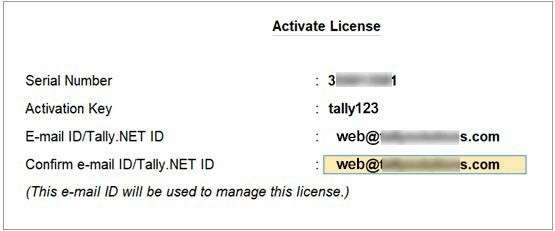

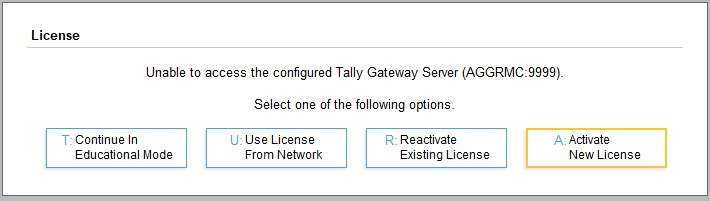
Step 7: Activate TallyPrime License (For New Users)
To use full features, you need to activate your license.
Steps:
- Select Activate New License
- Enter
- Serial Number
- Activation Key
- Email ID
- Press Enter
Next Step:
- You will receive an Unlock Key on email
- Enter the unlock key
Result:
- License gets activated successfully
Without activation, you can only use educational mode.
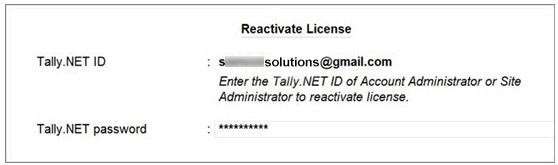
Step 8: Reactivate License (For Existing Users)
If you are reinstalling or changing systems:
Steps:
- Choose Reactivate License
- Enter existing details
- Complete verification
If the license is active on another system, you may need to surrender it first.
Step 9: Create or Open a Company
Once TallyPrime is activated:
Options:
- Create Company (for new business)
- Open Company (existing data)
- Import Data (from old versions)
This is where your actual accounting work begins.
Step 10: Start Using TallyPrime
After the setup is complete, you can start working.
You Can Perform:
- Accounting entries
- GST billing and returns
- Inventory management
- Payroll processing
- Financial reports
TallyPrime 7.0 provides a smooth and user-friendly experience.
Pro Tips for Smooth Installation
- Always use latest version (7.0)
- Keep backup before upgrading
- Use original license
- Ensure stable internet connection
Conclusion
Installing TallyPrime 7.0 is a simple yet crucial step for setting up a smooth and efficient accounting system for your business. Whether you are a beginner installing TallyPrime for the first time or an existing user upgrading from an older version, following the correct installation process ensures that your software runs without errors and performs at its best. From downloading the official setup file to activating your license and creating your company, every step plays an important role in ensuring a hassle-free experience. TallyPrime 7.0 not only offers improved performance and a better user interface but also provides advanced features like connected banking, enhanced reporting, and improved compliance management. By installing the latest version, you ensure that your business stays updated with the latest accounting standards and GST requirements. Always remember to download the software from a trusted source, keep regular backups, and use a valid license for uninterrupted usage.
TallyPrime offers an Educational Mode which is free to use with limited functionality. However, to access full features like GST, reports, and multi-user access, you need a valid licensed version.
Yes, you can install TallyPrime on multiple systems. However, the usage depends on your license type:
Silver License – Single user (one system at a time)
Gold License – Multi-user (can be accessed across multiple systems on a network)
Yes, you can easily upgrade from Tally ERP 9 to TallyPrime 7.0. Your existing data will be migrated during the upgrade process. It is recommended to take a backup before upgrading.
To activate your license:
Select Activate New License
Enter Serial Number, Activation Key, and Email ID
Enter the Unlock Key received via email
Yes, but only in Educational Mode, which has limitations such as restricted data entry dates. For full functionality, activation is required.
No, it is not recommended. Always download TallyPrime from the official website to avoid malware, corrupted files, or outdated versions.
The default installation path is:
C:\Program Files\TallyPrime
You can change it during installation if needed.