Introduction: What is TallyPrime TSS and Why It Matters.
If you are using TallyPrime for your business, you may have heard about Tally Software Services (TSS). Many users often ask:
“Is TSS necessary?”
“What benefits do I get after renewal?”
TSS is not just an add-on—it is a powerful service that enhances your TallyPrime
experience by providing updates, connectivity, automation, and compliance features.
In this detailed guide, you will understand everything about TallyPrime TSS, including its features, benefits, pricing, and why it is essential for modern businesses.
What is TallyPrime TSS (Tally Software Services)?
Tally Software Services (TSS) is an annual subscription service offered with TallyPrime that gives you access to:
• Latest software updates
• GST and compliance updates
• Remote access to your data
• Online features and services
Without TSS, your TallyPrime works, but you miss out on important updates and advanced features.
Key Features of TallyPrime TSS
1. Regular Software Updates- With TSS, you always get the latest version of TallyPrime with improved features and bug fixes.
2. GST & Compliance Updates- India’s tax system changes frequently. TSS ensures your software is always updated with:
• Latest GST rules
• E-invoicing updates
• E-way bill changes
3. Remote Access (Work from Anywhere)
TSS allows you to access your business data from anywhere using:
• Web browser
• Mobile device
Perfect for business owners who travel or manage multiple locations.
4. Data Synchronization
You can sync data between:
• Head office
• Branch offices
This helps in maintaining real-time data consistency.
5. Banking Integration
TSS enables:
• Bank reconciliation
• Online payment tracking
• Connected banking features
6. Data Security & Backup
TSS ensures:
• Secure data handling
• Safe backup options
• Reliable access control
Benefits of TallyPrime TSS for Businesses
-Stay Updated with Government Rules
Avoid penalties by staying compliant with GST and tax regulations.
-Improve Productivity
Remote access and automation reduce manual work and save time.
-Better Decision Making
Real-time reports help in making faster and smarter business decisions.
- Business Continuity
Work from anywhere without depending on office systems.
TallyPrime TSS Price in India (2026)
The cost of TSS is usually:
• ₹4,500 + GST per year (for Silver License)
• ₹13,500 + GST per year (for Gold License)
Prices may vary slightly depending on the provider.
TSS vs Without TSS – Key Difference
Feature
With TSS
Without TSS
Software Updates
Yes
No
GST Updates
Yes
No
Remote Access
Yes
No
Data Sync
Yes
No
Online Features
Yes
Limited
Is Tallyprime TSS Mandatory?
No, TSS is not mandatory, but it is highly recommended.
Without TSS:
• You won’t get updates
• No GST changes
• No online features
For businesses dealing with GST and compliance, TSS is almost essential.
Who Should Use TSS?
Recommended for:
• Businesses using GST
• Companies with multiple branches
• Growing businesses
• Accountants and professionals
Not necessary for:
• Very small businesses with no GST
• Offline-only users with basic needs
TallyPrime TSS is not just an optional service—it is a powerful upgrade that transforms your accounting software into a modern, connected business tool.
• Keeps you compliant
• Saves time
• Enables remote work
• Improves efficiency
If you want to run your business smoothly in 2026, TSS is definitely worth investing in.
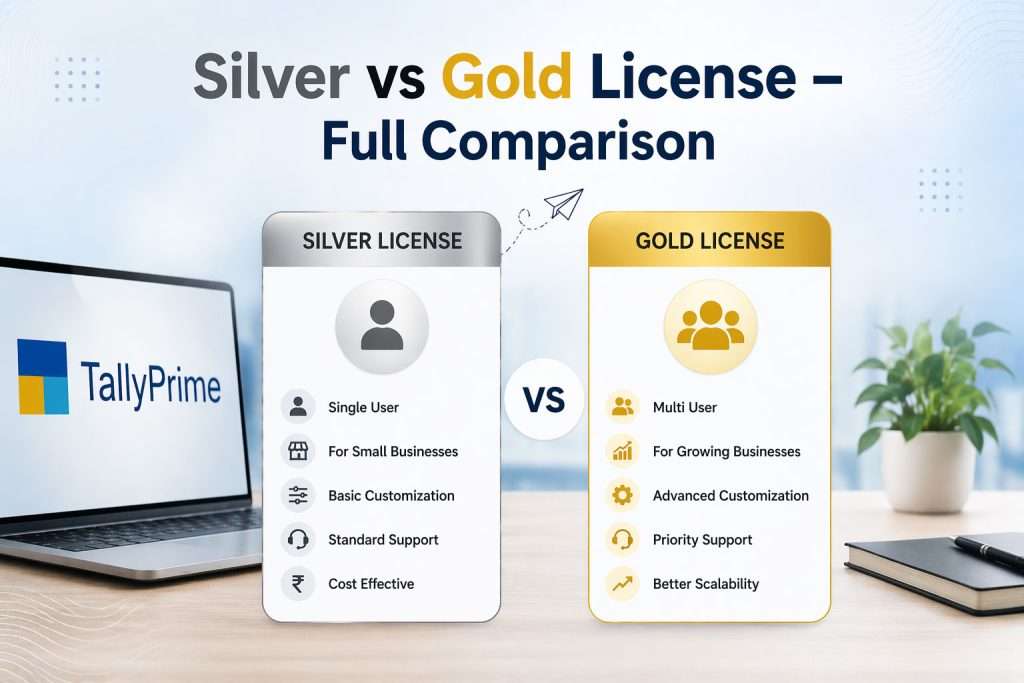
Choosing between a TallyPrime Silver and Gold license is one of the most important decisions for any business. The right choice depends on your team size, work environment, and business needs. We will compare both licenses in detail so you can make the best decision.
Silver vs Gold License – Full Comparison
Feature
Silver License
Gold License
Users
Single User
Multi-User (Unlimited LAN users)
Price
₹22,500 + GST
₹67,500 + GST
Usage
Restricted to one system
Accessible on multiple systems
Collaboration
No (Standalone)
Yes (Team-based)
Cost
Affordable / Budget-friendly
Higher cost (Value-oriented)
Ideal For
Small businesses / Solo operators
Medium to large businesses
What is TallyPrime Silver License?
The Silver License is designed for single user access. It is ideal for small businesses where only one person handles accounting or billing.
Key Benefits:
-Affordable one-time investment
-Easy to install and use
-Full accounting + GST features
-Perfect for startups and freelancers
Limitations:
-Only one user can work at a time
-No multi-user collaboration
-Not suitable for growing teams
Example: If you run a small shop or business with only one accountant, Silver is more than enough.
What is TallyPrime Gold License?
The Gold License is built for multi-user environments where multiple employees need to access Tally at the same time.
Key Benefits:
-Multiple users can work simultaneously
-Works on LAN (Local Area Network)
-Real-time data sharing across departments
-Better control with user roles & permissions
Limitations:
-Higher cost compared to Silver
-Requires basic network setup
Example: If your business has separate staff for billing, accounting, and inventory, Gold is the better choice.
Both TallyPrime Silver and Gold licenses offer powerful accounting features, but the right choice depends on your business size and workflow.
Silver = Simple & Cost-effective
Gold = Powerful & Scalable
Choosing the correct license will help improve your efficiency, save time, and support your business growth in the long run.
If you are planning to purchase Tally software for your business in 2026, one of the most common questions you will have is:
“What is the TallyPrime license price in India, and which version should I choose – Silver or Gold?”
Choosing the right license is not just about price—it directly affects your business operations, multi-user access, and long-term efficiency.
TallyPrime License Types in India (2026)
There are mainly two types of TallyPrime licenses:
Silver License (Single User)
Gold License (Multi User)
Both licenses come with lifetime validity, but their usage and pricing differ significantly.
TallyPrime Silver License Price in India (2026)
The Silver license is designed for single-user access. It is best suited for small businesses or individuals.
Price Details:
- Approx Price: ₹22,500 + GST (One-time)
- Usage: Only 1 user at a time
- Installation: Single system
Key Features:
Full Accounting: Covers the entire financial cycle, including ledger management, accounts payable/receivable, and multi-currency transactions.
GST Billing & Returns: Generates tax-compliant invoices (GST, e-way bills) and automates the categorization of data for accurate GSTR filing.
Inventory Management: Tracks stock levels across multiple locations, organizes items by category, and sets reorder alerts.
Basic Reports: Provides instant access to essential financial statements like Balance Sheets, P&L statements, and Cash Flow reports.
Best For:
Small businesses, Freelancers, Startups with limited staff
TallyPrime Gold License Price in India (2026)
The Gold license is designed for multi-user access within a local network.
Price Details:
- Approx Price: ₹67,500 + GST (One-time)
- Usage: Unlimited users on LAN
- Installation: Multiple systems in the same office
Key Features:
Multi-user Access: Enables several team members to log into the system simultaneously. It eliminates bottlenecks by allowing different departments (like sales and accounting) to work in the same environment without waiting for others to log out.
Real-time Data Sharing: Ensures that any update made by one user is instantly visible to all others. This "single source of truth" prevents errors caused by outdated information and keeps everyone synced on inventory, pricing, or project status.
Advanced Reporting: Moves beyond basic summaries to provide deep insights through customizable filters and data visualization. It allows managers to track specific KPIs, forecast trends, and generate complex financial or operational statements with a few clicks.
Better Control for Teams: Provides administrators with granular permission settings. You can restrict sensitive data (like payroll or profit margins) to specific roles while giving staff exactly the tools they need to perform their jobs efficiently.
Best For:
- Medium to large businesses, Companies with multiple accountants, Organizations needing team collaboration
Why Buy TallyPrime License from Webtakers IT Solutions?
When it comes to purchasing a TallyPrime license in India, choosing the right provider is just as important as selecting between Silver and Gold. At Webtakers IT Solutions, we don’t just sell software—we provide complete business solutions backed by expertise, trust, and dedicated support.
1. Trust and Authenticity
We provide 100% genuine and authorized licenses. This is critical for businesses to ensure they are compliant with software regulations and to receive official updates and security patches directly from Tally.
2. Cost-Effective Solutions
Competitive Pricing: We offer value-driven pricing for both Silver (Single User) and Gold (Multi-User) editions.
Expert Consultation: Before you buy, their team analyzes your business size and growth plans to ensure you don't overspend on a license that doesn't fit your needs.
3. Seamless Onboarding
One of their standout offerings is Free Installation and Hassle-Free Setup. This removes the technical barrier for businesses, ensuring that the software is activated and configured correctly from day one.
4. Long-Term Support & Speed
Instant Activation: They prioritize fast delivery so business operations aren't delayed.
Reliable After-Sales: They provide ongoing troubleshooting and guidance, which is vital for handling complex accounting or technical queries that arise post-purchase.
5. Extended Services
Beyond the license, they act as a full-service consultant by offering:
Data Migration: Moving your old records into TallyPrime safely.
Training: Ensuring your staff knows how to use the software efficiently.
Customization: Tailoring Tally to meet specific industry requirements.
What is the price of TallyPrime in India in 2026?
The price of TallyPrime depends on the license type:
Silver (Single User): ₹22,500 + GST (one-time)
Gold (Multi-User): ₹67,500 + GST (one-time)
Is TallyPrime a lifetime license?
Yes, TallyPrime comes with a lifetime license, meaning you pay once and can use it forever. However, for updates and support, you may need to renew TSS (Tally Software Services).
What is the difference between a Silver and Gold license?
Silver License: Single user, one system
Gold License: Multi-user, works on multiple systems within a LAN
Gold is best for businesses with multiple employees, while Silver suits small businesses.
Can I upgrade from Silver to Gold license?
Yes, you can easily upgrade from Silver to Gold by paying the price difference. Your existing data remains safe during the upgrade.
Does TallyPrime support GST billing?
Yes, TallyPrime fully supports GST billing, return filing, e-invoicing, and e-way bill generation, making it suitable for Indian businesses.
If you’re planning to buy TallyPrime or need support for your existing Tally setup, we’re here to help.
Contact Webtakersit
Learn how to take backup and restore company data in TallyPrime with this complete step-by-step guide. Protect your business data from loss, crashes, or errors with easy backup and recovery methods.
Introduction
In today’s fast-paced digital world, your business data is one of your most valuable assets. Whether you run a small shop, manage a growing company, or handle accounts professionally, losing your financial data can cause serious problems. This is where TallyPrime, one of the most trusted accounting software solutions, plays an important role.
TallyPrime not only helps you manage your accounts efficiently but also provides powerful features to secure your company data. One of the most important features is the ability to take backups and restore data whenever needed.
Understanding the Importance of Data Backup in TallyPrime
Data backup is the process of creating a copy of your company data so that it can be restored in case of data loss. Imagine working for months or years and suddenly losing all your accounting records due to a system crash or virus attack. Without backup, recovery becomes almost impossible.
Why Backup is Important in TallyPrime
Before diving into the steps, let’s understand why backups are crucial:
- Protects data from hardware failure
- Prevents loss due to accidental deletion
- Safeguards against virus or ransomware attacks
- Helps in smooth data migration
- Ensures business continuity
Types of Backup in TallyPrime
Manual Backup – Taken by the user whenever required
Automatic Backup – Scheduled backups using external tools
3.External Backup - Backup stored on USB drives or external hard disks.
How to Take Backup in TallyPrime
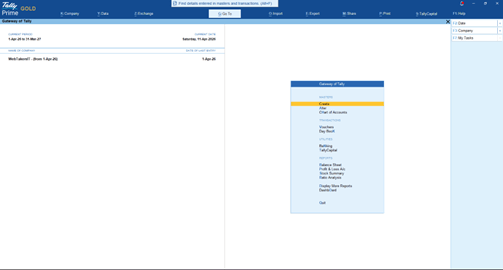
Step 1: Open TallyPrime
First, open TallyPrime on your computer
You will see the Gateway of Tally screen
Step 1: Open TallyPrime
First, open TallyPrime on your computer
You will see the Gateway of Tally screen
Step 3: Select Source (Company Data Location)
In the Source field, select where your company data is stored
By default, it shows something like:
C:UsersPublicTallyPrimeData
👉 If your data is stored somewhere else:
Click on the path
Press Backspace
Enter the correct location
Step 4: Select Companies for Backup
You will see a list of companies
Select:
One company → Press Spacebar
Multiple companies → Select one by one using Spacebar
All companies → Press Ctrl + A
Step 1: Open TallyPrime
First, open TallyPrime on your computer
You will see the Gateway of Tally screen
Step 1: Open TallyPrime
First, open TallyPrime on your computer
You will see the Gateway of Tally screen
Step 3: Select Source (Company Data Location)
In the Source field, select where your company data is stored
By default, it shows something like:
C:UsersPublicTallyPrimeData
👉 If your data is stored somewhere else:
Click on the path
Press Backspace
Enter the correct location
Step 4: Select Companies for Backup
You will see a list of companies
Select:
One company → Press Spacebar
Multiple companies → Select one by one using Spacebar
All companies → Press Ctrl + A
Step 5: Choose Destination (Where Backup Will Be Saved)
In the Destination field, choose where you want to save the backup
Recommended places:
-External Hard Drive
-Pen Drive
-Different folder (not same drive)
Example: D:Tally Backup
Step 6: Start Backup Process
After selecting everything
Press Enter
Tally will start backing up your data
Step 7: Backup Completed
Once done, you will see a confirmation message
Your backup is now safely stored
Best Practices for Taking Backup
- Always store backups in multiple locations
- Use external drives or cloud storage
- Take backups regularly (daily or weekly)
- Maintain version-wise backups
- Use proper naming conventions
How to Restore Company Data in TallyPrime
Step 1: Open TallyPrime
Open TallyPrime
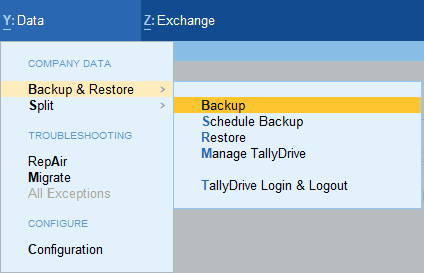
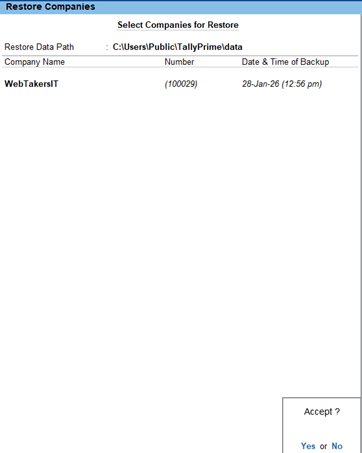
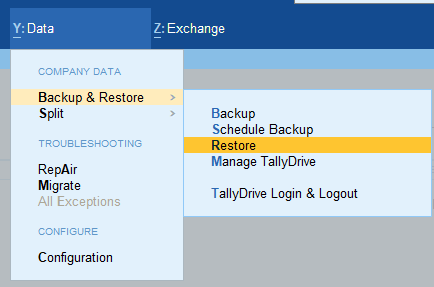
Step 2: Go to Restore Option
Press Alt + Y
Select Restore
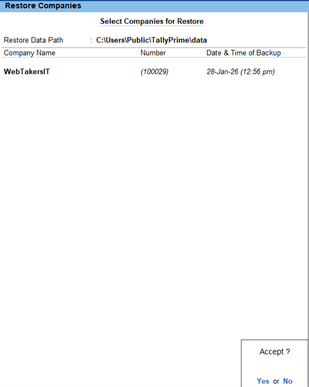
Step 3: Select Backup Source
Choose the folder where backup is stored
Example: D:Tally Backup
Step 4: Select Destination Folder
Choose where you want to restore data
Default: C:UsersPublicTallyPrimeData
Step 5: Select Company
Select the company you want to restore
Step 1: Open TallyPrime
Open TallyPrime
Step 2: Go to Restore Option
Press Alt + Y
Select Restore
Step 3: Select Backup Source
Choose the folder where backup is stored
Example: D:Tally Backup
Step 4: Select Destination Folder
Choose where you want to restore data
Default: C:UsersPublicTallyPrimeData
Step 5: Select Company
Select the company you want to restore
Common Errors During Backup and Restore (With Solutions)
Incorrect Path Error
Solution: Double-check folder location.
Access Denied Error
Solution: Run TallyPrime as Administrator.
Backup Not Found
Solution: Ensure correct folder selection.
Corrupted Backup File
Solution: Use another backup copy.
Conclusion
Taking backup and restoring company data in TallyPrime is a simple yet powerful feature that ensures your business data remains safe and recoverable. By following the steps and best practices mentioned above, you can protect your accounting data from unexpected situations and ensure smooth business operations.
How often should I take backup in TallyPrime?
You should take backups daily or weekly depending on your business activity.
Is it necessary to enable security?
Yes, you can restore backup data on any system with TallyPrime installed.
Where should I store backups?
It is recommended to store backups on external drives and cloud storage.
What happens if backup is corrupted?
You should keep multiple backup copies to avoid data loss.
Is backup automatic in TallyPrime?
Answer: No, backup is manual but can be scheduled externally.
TallyPrime is one of the most powerful and widely used accounting software solutions for businesses in India and across the globe. Whether you are a small business owner, accountant, or entrepreneur, creating a company in TallyPrime is the first and most crucial step to managing your financial data efficiently.
In this comprehensive guide, we will walk you through everything you need to know about how to create a company in TallyPrime. This step-by-step tutorial is designed in a simple, professional, and human-friendly manner, making it easy for beginners to understand and implement.
By the end of this blog, you will be able to confidently create a company in TallyPrime and start managing your accounting operations smoothly.
What is TallyPrime?
TallyPrime is an advanced business management software developed by Tally Solutions. It helps businesses manage accounting, inventory, taxation (GST), payroll, and more in a seamless and efficient way. Creating a company in TallyPrime means setting up your business profile where all financial transactions, reports, and records will be stored.
Why Creating a Company in TallyPrime is Important
Before entering any transactions, you must create a company in TallyPrime. This process defines your business identity within the software.
Key Benefits:
- Organizes financial records in one place
- Enables GST compliance
- Helps generate reports like Balance Sheet, Profit & Loss
- Ensures accurate bookkeeping
- Supports multi-company management
Before creating a company, ensure your system meets the following requirements:
- Operating System: Windows 7 or above
- RAM: Minimum 2 GB (4 GB recommended)
- Disk Space: At least 1 GB free space
- TallyPrime Latest Version (e.g., Release 7.0)
Step-by-Step Guide to Create a Company in TallyPrime
Step 1: Open TallyPrime
Once you install TallyPrime, double-click the TallyPrime icon on your desktop. The software will launch and display the Gateway of Tally screen.
Step 2: Select ‘Create Company’
On the startup screen, you will see an option:
“Create Company”
Click on this option to begin the process.
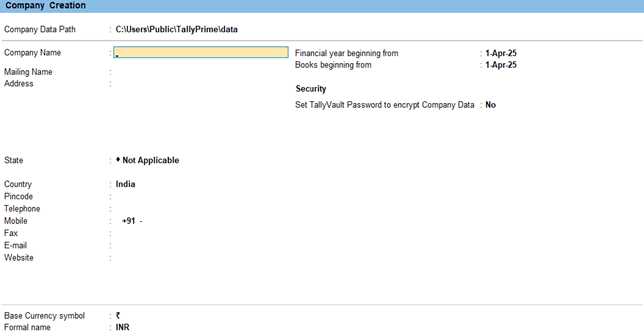
Step 3: Company Creation Screen
After clicking Create Company, a detailed form will appear where you need to enter company details.
Let’s understand each field carefully.
Step 4: Enter Basic Company Details
Company Data Path
This is the location where your company data will be stored. By default, it is set automatically, but you can change it if required.
Name
Enter your business or company name.
Mailing Name and Address
Enter your official business address. This will appear on invoices and reports.
Country
Select your country (India).
State
Choose your business state. This is important for GST calculations.
Pin Code
Enter your area pin code.
Phone Number and Email
Provide your contact details.
Step 1: Open TallyPrime
Once you install TallyPrime, double-click the TallyPrime icon on your desktop. The software will launch and display the Gateway of Tally screen.
Step 2: Select 'Create Company'
On the startup screen, you will see an option:
"Create Company"
Click on this option to begin the process.
Step 3: Company Creation Screen
After clicking Create Company, a detailed form will appear where you need to enter company details.
Let’s understand each field carefully.
Step 4: Enter Basic Company Details
Company Data Path
This is the location where your company data will be stored. By default, it is set automatically, but you can change it if required.
Name
Enter your business or company name.
Mailing Name and Address
Enter your official business address. This will appear on invoices and reports.
Country
Select your country (India).
State
Choose your business state. This is important for GST calculations.
Pin Code
Enter your area pin code.
Phone Number and Email
Provide your contact details.
Step-by-Step Guide to Create a Company in TallyPrime
Step 5: Enter Financial Details
Financial Year Beginning From
Enter the starting date of your financial year (e.g., 01-Apr-2026).
Books Beginning From
Enter the date from which you want to start maintaining accounts.
Step 6: Security Settings
You can enable security to protect your company data.
– Use Security Control: Yes/No
– Set Username and Password
It is recommended to enable this for data protection.
Step 7: Base Currency Information
– Currency Symbol: ₹
– Formal Name: INR
– Number of Decimal Places: 0
These settings are usually auto-filled.
Step 8: Save the Company
After entering all details, press Ctrl + A to save the company.
Congratulations! Your company has been successfully created in TallyPrime
Step 5: Enter Financial Details
Financial Year Beginning From
Enter the starting date of your financial year (e.g., 01-Apr-2026).
Books Beginning From
Enter the date from which you want to start maintaining accounts.
Step 6: Security Settings
You can enable security to protect your company data.
- Use Security Control: Yes/No
- Set Username and Password
It is recommended to enable this for data protection.
Step 7: Base Currency Information
- Currency Symbol: ₹
- Formal Name: INR
- Number of Decimal Places: 0
These settings are usually auto-filled.
Step 8: Save the Company
After entering all details, press Ctrl + A to save the company.
Congratulations! Your company has been successfully created in TallyPrime
Important Features After Company Creation
Once your company is created, you can start using TallyPrime features such as:
- Creating Ledgers
- Recording Transactions
- GST Setup
- Inventory Management
- Generating Reports
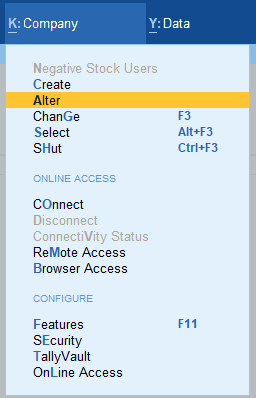
How to Alter Company Details in TallyPrime
If you need to edit company details later:
Go to Gateway of Tally
Press Alt + K (Company)
Select Alter
Choose your company
Make changes and save
How to Shut Company in TallyPrime
To close a company:
Go to Gateway of Tally
Press Alt + K
Select Shut Company
Common Mistakes to Avoid
Entering Incorrect Financial Year: The financial year in India typically begins on 01-Apr. Entering the wrong date can lead to mismatched reports and issues with year-end closings.
Wrong GST State Selection: Selecting the correct state is vital because TallyPrime uses this information to calculate GST (like CGST, SGST, or IGST) correctly. An error here can lead to incorrect tax filings.
Not Enabling Security: Failing to set a Username and Password leaves your sensitive financial data vulnerable. It is highly recommended to protect your business records from unauthorized access.
Incorrect Address Details: Your mailing name and address appear directly on official invoices and reports. Errors here can make your business look unprofessional or cause legal compliance issues with tax authorities.
Not Double-Checking Information: Always review your entries before saving (pressing Ctrl + A) to ensure all basic details, contact info, and currency settings are accurate from the start.
Tips for Beginners
Always Take Backup of Your Data: Regular backups are essential to prevent data loss due to system failures or accidental deletions.
Use Strong Passwords: When you enable security control, choose a password that is difficult to guess to ensure maximum data protection.
Regularly Update TallyPrime: Ensure you are using the latest version (such as Release 7.0) to access new features, bug fixes, and updated statutory compliance tools.
Learn Shortcuts for Faster Work: TallyPrime is designed for speed. Learning shortcuts (like Alt + K for company menu or Ctrl + A to save) will significantly improve your efficiency.
Conclusion
Creating a company in TallyPrime is the foundation of your accounting journey. With the right setup, you can efficiently manage your business finances, ensure compliance, and generate accurate reports.
By following this detailed guide, you can easily create and manage your company in TallyPrime without any confusion.
Can I create multiple companies in TallyPrime?
Yes, TallyPrime allows you to create and manage multiple companies.
Is it necessary to enable security?
It is not mandatory, but highly recommended for data protection.
Can I edit company details later?
Yes, you can alter company details anytime.
What if I enter the wrong financial year?
You can correct it by altering company details, but it’s better to enter it correctly initially.
TallyPrime 7.0 is the latest version of Tally’s powerful accounting software designed for businesses, accountants, and professionals. Installing TallyPrime correctly is the first step toward managing your accounting, GST, payroll, and inventory efficiently.
This comprehensive guide explains how to install TallyPrime 7.0 step by step for both new and existing users. It includes downloading, installation, activation, and starting the software in a structured and easy-to-follow manner.
2. What is TallyPrime 7.0?
TallyPrime 7.0 is an advanced business management software that simplifies accounting and compliance.
Key features include faster performance, connected banking, improved user interface, and enhanced reporting.
It is widely used by small businesses, enterprises, and accounting professionals.
How to InstallStep 1: Download TallyPrime Setup FileHow to Download:
The setup file (usually .exe format) will start downloading
It will be saved in your Downloads folder
Step 2: Run the TallyPrime Installer
Once the file is downloaded, the next step is to run the installer and start the setup process.
How to Run Installer:
Go to your Downloads folder
Locate the file (e.g., tallyprime.exe)
Double-click on the file
If Security Prompt Appears:
Click on “Yes” or “Run Anyway”
This allows the installation to begin
If Installer Does Not Open:
Right-click on the file
Select “Run as Administrator”
Running the installer properly ensures that TallyPrime gets the required system permissions.
Step 3: Choose Installation Type
Options Available:
Install New (For New Users)
Select this if you are installing
TallyPrime for the first time
It will create fresh program files
Upgrade (For Existing Users)
Choose this if you already have an older version
It will upgrade without deleting your data
Best Practice:
Always take a backup of your data before upgrading
Selecting the correct option is important to avoid data loss.
Step 4: Configure Installation Path
Before installing, you can choose where the software will be installed.
Default Path:
C:Program FilesTallyPrime
Why This Matters:
Default path ensures smooth functioning
Custom path is useful for advanced users or servers
For most users, it is best to keep default settings.
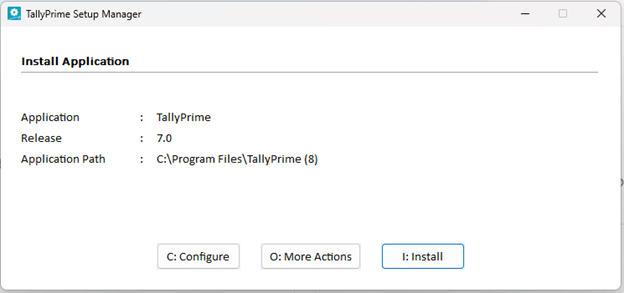
Step 5: Install TallyPrime Software
Now comes the actual installation step.
Steps:
Click on the Install button
Wait for a few seconds
During Installation:
Files will be copied to your system
Required components will be installed automatically
Once completed, you will see a confirmation message.
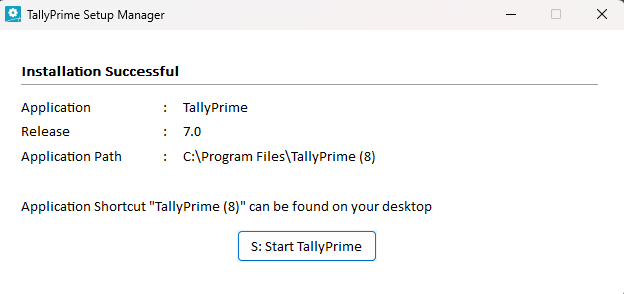
Step 6: Start TallyPrime
After installation is complete, you can launch the software.
How to Start:
Click on “Start TallyPrime”
Or open from desktop shortcut
What You Will See:
Welcome screen of TallyPrime
Gateway of Tally interface
This confirms that installation is successful.
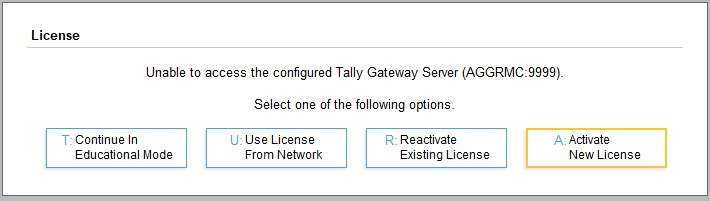
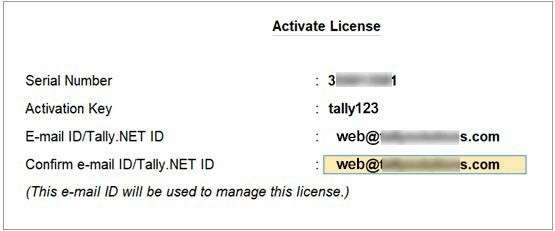
Step 7: Activate TallyPrime License (For New Users)
To use full features, you need to activate your license.
Steps:
Select Activate New License
Enter
Serial Number
Activation Key
Email ID
Press Enter
Next Step:
You will receive an Unlock Key on email
Enter the unlock key
Result:
License gets activated successfully
Without activation, you can only use educational mode.
Step 3: Choose Installation Type
Options Available:
Install New (For New Users)
Select this if you are installing
TallyPrime for the first time
It will create fresh program files
Upgrade (For Existing Users)
Choose this if you already have an older version
It will upgrade without deleting your data
Best Practice:
Always take a backup of your data before upgrading
Selecting the correct option is important to avoid data loss.
Step 4: Configure Installation Path
Before installing, you can choose where the software will be installed.
Default Path:
C:Program FilesTallyPrime
Why This Matters:
Default path ensures smooth functioning
Custom path is useful for advanced users or servers
For most users, it is best to keep default settings.
Step 5: Install TallyPrime Software
Now comes the actual installation step.
Steps:
Click on the Install button
Wait for a few seconds
During Installation:
Files will be copied to your system
Required components will be installed automatically
Once completed, you will see a confirmation message.
Step 6: Start TallyPrime
After installation is complete, you can launch the software.
How to Start:
Click on “Start TallyPrime”
Or open from desktop shortcut
What You Will See:
Welcome screen of TallyPrime
Gateway of Tally interface
This confirms that installation is successful.
Step 7: Activate TallyPrime License (For New Users)
To use full features, you need to activate your license.
Steps:
Select Activate New License
Enter
Serial Number
Activation Key
Email ID
Press Enter
Next Step:
You will receive an Unlock Key on email
Enter the unlock key
Result:
License gets activated successfully
Without activation, you can only use educational mode.
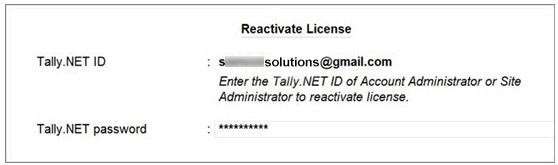
Step 8: Reactivate License (For Existing Users)
If you are reinstalling or changing systems:
Steps:
Choose Reactivate License
Enter existing details
Complete verification
If the license is active on another system, you may need to surrender it first.
Step 9: Create or Open a Company
Once TallyPrime is activated:
Options:
Create Company (for new business)
Open Company (existing data)
Import Data (from old versions)
This is where your actual accounting work begins.
Step 10: Start Using TallyPrime
After the setup is complete, you can start working.
You Can Perform:
Accounting entries
GST billing and returns
Inventory management
Payroll processing
Financial reports
TallyPrime 7.0 provides a smooth and user-friendly experience.
Pro Tips for Smooth Installation
Always use latest version (7.0)
Keep backup before upgrading
Use original license
Ensure stable internet connection
Conclusion
Installing TallyPrime 7.0 is a simple yet crucial step for setting up a smooth and efficient accounting system for your business. Whether you are a beginner installing TallyPrime for the first time or an existing user upgrading from an older version, following the correct installation process ensures that your software runs without errors and performs at its best. From downloading the official setup file to activating your license and creating your company, every step plays an important role in ensuring a hassle-free experience. TallyPrime 7.0 not only offers improved performance and a better user interface but also provides advanced features like connected banking, enhanced reporting, and improved compliance management.
By installing the latest version, you ensure that your business stays updated with the latest accounting standards and GST requirements. Always remember to download the software from a trusted source, keep regular backups, and use a valid license for uninterrupted usage.
Is TallyPrime 7.0 free to use?
TallyPrime offers an Educational Mode which is free to use with limited functionality. However, to access full features like GST, reports, and multi-user access, you need a valid licensed version.
Can I install TallyPrime on multiple computers?
Yes, you can install TallyPrime on multiple systems. However, the usage depends on your license type:
Silver License – Single user (one system at a time)
Gold License – Multi-user (can be accessed across multiple systems on a network)
Can I upgrade from Tally ERP 9 to TallyPrime 7.0?
Yes, you can easily upgrade from Tally ERP 9 to TallyPrime 7.0. Your existing data will be migrated during the upgrade process. It is recommended to take a backup before upgrading.
What should I do if TallyPrime installation fails?If installation fails, try the following:
Run the setup file as Administrator
Disable antivirus temporarily
Check system requirements
Re-download the setup file from the official website
How do I activate my TallyPrime license?
To activate your license:
Select Activate New License
Enter Serial Number, Activation Key, and Email ID
Enter the Unlock Key received via email
Can I use TallyPrime without activating the license?
Yes, but only in Educational Mode, which has limitations such as restricted data entry dates. For full functionality, activation is required.
Is it safe to download TallyPrime from third-party websites?
No, it is not recommended. Always download TallyPrime from the official website to avoid malware, corrupted files, or outdated versions.
What is the default installation path of TallyPrime?
Learn how to move data to the new financial year in TallyPrime 7.0 with step-by-step methods including change period, split company data, and create new company with import.
As businesses step into the new financial year 2026–27, it becomes essential to manage accounting data efficiently. TallyPrime 7.0 offers a seamless process to move your data from one financial year to another, ensuring continuity, accuracy, and compliance.
This guide explains everything in a professional yet easy-to-understand manner, helping you perform data migration step-by-step.
Moving data to new financial year
Moving data to a new financial year means carrying forward your closing balances, ledgers, and other financial records from FY 2025–26 into FY 2026–27 while keeping previous year data intact.
When Should You Use This Method?
Books are not yet finalized You want to continue working without splitting data You need continuous reporting across years
Step 1: Open Company in TallyPrime Go to Gateway of Tally
Step 2: Change Period Press F2 (Period) Enter: From: 01-04-2026 To: 31-03-2027
Step 3: Save Press Enter
All closing balances of 2025-26 become opening balances of 2026-27 You can continue voucher entry seamlessly No new company is created
Step 1: Open Company in TallyPrime Go to Gateway of Tally
Step 2: Change Period Press F2 (Period) Enter: From: 01-04-2026 To: 31-03-2027
Step 3: Save Press Enter
All closing balances of 2025-26 become opening balances of 2026-27 You can continue voucher entry seamlessly No new company is created
Splitting Company Data
Splitting company data divides your existing data into two separate financial years while keeping the original data intact.
When Should You Use This Method? ● Books of accounts are finalized or audited ● Data size is large ● You want separate data for each financial year
Benefits
● Reduces data size ●Improves performance ● Keeps data secure and organized ● Separate company for each financial year
Step 1: Verify Data
Go to: Gateway of Tally → Alt + Y (Data) → Split → Verify Data
Fix any errors before proceeding
Step 2: Split Data
Go to: Gateway of Tally → Alt + Y → Split → Split Data
Step 3: Enter Split Date
Enter: 01-04-2026
Step 4: Choose Split Option
Options:
From Split Date
Before Split Date
Into Two Companies
Step 5: Confirm
Press Enter → Yes
What Happens After Splitting?● Two companies will be created:● One for 2025–26● One for 2026–27● Data is automatically separated● Ledger balances are carried forward
Create New Books & Import Data
You create a new company and import only the required data (like opening balances).
When Should You Use This Method?
• You want fresh accounting records
• You want clean data without old transactions
• You need only opening balances
Step 1: Export Data from Old Company
• Go to: Gateway of Tally → Chart of Accounts → Ledgers → Export
• Select: Format- XML
• Export closing balances
Step 2: Create New Company • Go to: Gateway of Tally → Alt + K → Create Company • Enter • Financial Year: 01-04-2026 • Books Beginning From: 01-04-2026
Step 3: Import Data
Go to: Gateway of Tally → Import Data → Masters
• Select XML file
Step 4: Confirm Import
Choose behavior if data already exists
Press Enter
What Happens After Import?
Opening balances are created
You start fresh accounting
No old transactions are carried
Step 1: Export Data from Old Company
• Go to: Gateway of Tally → Chart of Accounts → Ledgers → Export
• Select: Format- XML
• Export closing balances
Step 2: Create New Company • Go to: Gateway of Tally → Alt + K → Create Company • Enter • Financial Year: 01-04-2026 • Books Beginning From: 01-04-2026
Moving data to a financial year refers to the process of transferring or organizing company data into a specific financial period. This helps in maintaining records separately for each financial year.
Why is it important to move data to a financial year?
It is important because:
It organizes data year-wise
Improves system performance
Speeds up report generation
Separates historical and current data
When should I move data to a new financial year?
You should move data:
At the end of the financial year (after March 31)
When your data size becomes too large
When you want to maintain only current year data for active use
Is moving data the same as splitting company data?
Yes, in most cases, moving data and splitting company data refer to the same process, where data is divided into separate financial years.
Will I lose my old data after moving it?
No, your old data remains (safe). The system:
Retains previous year data
Creates a separate dataset for the new financial year
What precautions should I take before moving data?
Before moving data, you should:
Take a complete backup
Ensure all entries are recorded
Finalize accounts and complete audits if applicable
Can I continue working after moving data to a new financial year?
Yes, you can continue working without any issues. You can:
Record transactions in the new financial year
Access previous year data for reference
Does moving data affect reports?
No, it does not negatively affect reports. In fact:
Reports are available year-wise
Analysis and comparison become easier
Can I move data multiple times?
No, once the data is split or moved, the same process cannot be repeated in the same way. Therefore, it should be done carefully.
What happens to opening balances after moving data?
Opening balances are automatically carried forward. The closing balances of the previous year become the opening balances of the new financial year.
Is it necessary to move data every year?
It is not mandatory, but it is highly recommended, especially when:
The data volume is large System performance slows down
Say Goodbye to Manual Payments with Bharat Connect Integration
What is Bharat Connect?
Bharat Connect is a modern digital framework designed to simplify and standardize business-to-business (B2B) transactions in India. It allows businesses to exchange invoices digitally, process payments seamlessly, and reconcile transactions automatically.
Bharat Connect in TallyPrime 7.0 is a feature that allows businesses to manage and pay bills directly from Tally using India’s digital payment infrastructure.
How it works in TallyPrime 7.0
Businesses using TallyPrime (Release 7.0 and via plugin from Release 6.0 onwards) can seamlessly get started with Bharat Connect by first completing their GSTIN registration and obtaining a unique B2B ID. Once set up, they can begin transacting directly within TallyPrime. Users can easily log in to track real-time activities such as newly received invoices, pending acknowledgments, and payment updates.
Why Bharat Connect is Important in 2026
In today’s fast-paced business environment, speed and accuracy are critical. Businesses cannot afford delays, errors, or inefficiencies in their financial operations.
Bharat Connect addresses these challenges by introducing automation, real-time visibility, and seamless integration. It ensures that businesses can focus more on growth and less on operational hassles.
🔷 Key Features of Bharat Connect
1. 📄 Digital Invoice Exchange Bharat Connect allows businesses to send and receive invoices digitally. This eliminates paperwork and reduces the chances of errors.
2. 💳 Seamless Payment Integration The platform integrates with payment systems, enabling instant or scheduled payments directly from invoices. It significantly reduces payment delays and enhances cash flow management for businesses.
3. 📊 Real-Time Tracking Businesses can track invoice status, payment status, and transaction history in real-time. Users can instantly monitor: Invoice status (pending, approved, paid) Payment progress, Transaction confirmations This real-time visibility helps businesses make faster decisions and maintain better financial control.
4. 🔐 Secure Transactions Advanced security protocols ensure that all transactions are encrypted and safe.
5. ⚙️ Automated Reconciliation Manual reconciliation is time-consuming and prone to errors. Bharat Connect eliminates this challenge with automated reconciliation, where payments are automatically matched with corresponding invoices.
This ensures: ✔️ Accurate financial records ✔️ Reduced accounting workload ✔️ Faster closing of books ✔️ It is especially beneficial for businesses handling large transaction volumes. ✔️ Payments are automatically matched with invoices, saving time and reducing manual effort.
6. 🧾 GST Compliance Bharat Connect supports GST-compliant invoicing, helping businesses stay aligned with Indian tax regulations.
It ensures: ✔️ Proper invoice formatting ✔️ Accurate tax calculations ✔️ Easy record maintenance for audits ✔️ This helps businesses stay compliant while avoiding penalties and errors.
7. 🔗 Integration with TallyPrime It can be integrated with tools like TallyPrime, making it easier for businesses to manage finances without switching platforms.
This integration allows: ✔️ Direct syncing of invoices and payments ✔️ Automatic data entry ✔️ Real-time financial updates
As a result, businesses can manage their accounting and payment workflows in one unified ecosystem, saving both time and effort.
🔄 How Bharat Connect Works
Step 1: 📝 Business Registration & Activation The journey begins with a simple registration process. Businesses need to onboard and activate Bharat Connect through their banking partner or integrated platform.
Once registered, they gain access to a secure and centralized system that connects them to a digital payment and invoicing ecosystem.
Step 2: 🤝 Connect with Buyers and Suppliers After activation, businesses can seamlessly connect with their buyers and suppliers within the network.
This creates a digitally connected ecosystem where all parties can exchange invoices and payment information without relying on external communication channels like emails or manual sharing.
Step 3: 📤 Send Invoices Digitally Businesses can generate and send invoices directly through Bharat Connect. These invoices are shared instantly in a standardized digital format. This eliminates paperwork, reduces errors, and ensures that invoices reach the recipient without delays.
Step 4: 📥 Automatic Invoice Receipt & Recording Once the invoice is sent, the buyer receives it instantly within their system. The key advantage here is automation—invoice data is automatically recorded in the buyer’s accounting system, reducing manual data entry and improving accuracy.
Step 5: 💸 Payment Initiation After verifying the invoice, the buyer can initiate payment directly from the same platform. With integrated payment options, the process becomes seamless—there’s no need to switch between multiple systems. This speeds up the payment cycle and improves cash flow for businesses.
Step 6: 🔄 Automatic Reconciliation The final step is where Bharat Connect truly stands out—auto reconciliation.
As soon as the payment is completed: ✔️ The system automatically matches the payment with the corresponding invoice ✔️ Records are updated in real-time ✔️ No manual intervention is required
This ensures error-free accounting and significantly reduces operational workload.
🌟 Benefits of Bharat Connect
1. 🚀 Increased Efficiency By digitizing invoices and payments, businesses can save time and reduce manual workload.
4. ❌ Reduced Errors Automation minimizes human errors in invoicing and reconciliation.
5. 💰 Cost Savings Less paperwork and manual processing lead to significant cost reduction.
6. 📋 Better Compliance GST-compliant processes help avoid penalties and ensure smooth audits.
7. 📈 Scalability Suitable for small, medium, and large enterprises, Bharat Connect grows with your business.
🏁 Conclusion
Bharat Connect is transforming the way businesses handle transactions in India. By combining digital invoicing, seamless payments, and automated reconciliation, it offers a powerful solution for modern businesses.
As India continues its journey towards a digital economy, platforms like Bharat Connect will play a crucial role in enabling efficient, transparent, and scalable business operations.
Adopting Bharat Connect today can help businesses stay ahead of the curve and unlock new growth opportunities in the digital era.
We are pleased to announce Gold Up — our new sales initiative featuring a limited-period upgrade offer that enables your customers to move from TallyPrime Single User (India) to TallyPrime Multi-User (India), delivering strong customer value and attractive earning potential for you.
Offer Period:15 December 2025 to 15 March 2026 During this window, your India customers can upgrade from TallyPrime Silver to TallyPrime Gold at a flat 25% discount.
Why This Matters for You
🔹 Enhanced Margins Earn higher margins on every successful Single User (Silver) to Multi-User (Gold) upgrade completed during the offer period.
🔹 Account Growth Upgrading customers to TallyPrime Gold deepens your relationship with them and supports long-term customer retention.
🔹 Future Value Multi-User licences contribute to increased TSS renewal value, creating sustained revenue opportunities in the future.
The detailed incentive structure is attached for your reference. This is an excellent opportunity to proactively engage customers who are planning to scale their operations.
Important Note: This offer is applicable only on full-price upgrades where the Single User licence was activated on or before 11 December 2025.
We look forward to driving growth and achieving stronger results together.


 TallyPrime License Types in India (2026)
 TallyPrime Gold License Price in India (2026)


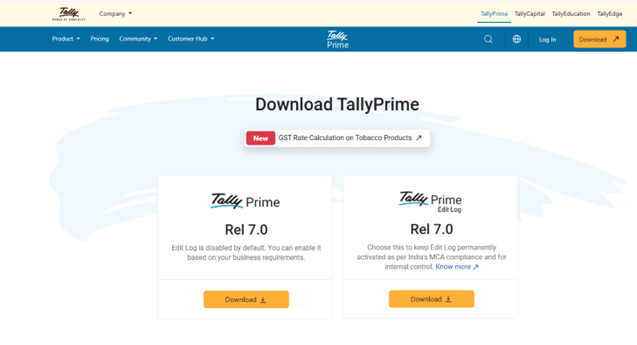 Step 1: Download TallyPrime Setup File
How to Download:
Step 1: Download TallyPrime Setup File
How to Download: